
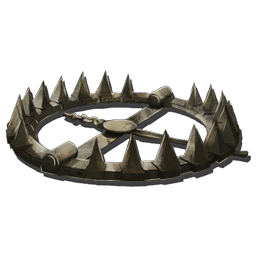
Large Bear Trap
Immobilizes large creatures only.
Details
- Category
- Structure
- Games
- ASE + ASA
- Expansion
- Base
- Recipe
- 3 ingredients
- Loot crates
- 66 crates
- Item ID
- 380
Engram
How you unlock it
- Required level
- 31
- Engram points
- 12
Learn these first
Maps
Found on 14 maps
Video guides: search YouTube for Large Bear Trap guides
How to craft Large Bear Trap
Large Bear Trap is crafted from 3 ingredients. The engram unlocks at level 31, costs 12 engram points, takes 5 seconds, gives 8 XP.


 Smithy
Raw materials
If you craft every ingredient yourself
 12Metal
Crafted along the way: Metal Ingot ×6.
How to get Large Bear Trap
Large Bear Trap is found in 66 loot crates.
Loot crates
66 crates
- Aberration BlueAberration and Valguero · ASA
- Aberration Blue BonusAberration and Valguero · ASA
- Aberration PurpleAberration and Valguero · ASA
- Aberration Purple BonusAberration and Valguero · ASA
- Aberration Surface BlueAberration · ASA
- Aberration Surface Blue BonusAberration · ASA
- Aberration Surface PurpleAberration · ASA
- Aberration Surface Purple BonusAberration · ASA
- Astraeos Desert PurpleAstraeos · ASA
- Astraeos Desert Purple BonusAstraeos · ASA
- Astraeos PurpleAstraeos · ASA
- Astraeos Purple BonusAstraeos · ASA
Show all 66 crates
- Genesis BlueGenesis Part 2 · ASE
- Genesis CyanGenesis Part 2 · ASE
- Genesis GreenGenesis Part 2 · ASE
- Genesis OrangeGenesis Part 2 · ASE
- Genesis PurpleGenesis Part 2 · ASE
- Genesis RedGenesis Part 2 · ASE
- Genesis WhiteGenesis Part 2 · ASE
- Genesis YellowGenesis Part 2 · ASE
- Island PurpleThe Island, The Center, and Ragnarok · ASA
- Island Purple BonusThe Island, The Center, and Ragnarok · ASA
- Lost Colony City BlueLost Colony · ASA
- Lost Colony City YellowLost Colony · ASA
- Mission 'Bulbdog Fetch' EasyGenesis Part 2 · ASE
- Mission 'Bulbdog Fetch' HardGenesis Part 2 · ASE
- Mission 'Bulbdog Fetch' MediumGenesis Part 2 · ASE
- Mission 'Circuit Chase' EasyGenesis Part 2 · ASE
- Mission 'Circuit Chase' HardGenesis Part 2 · ASE
- Mission 'Circuit Chase' MediumGenesis Part 2 · ASE
- Mission 'Downriver Run' EasyGenesis Part 2 · ASE
- Mission 'Downriver Run' HardGenesis Part 2 · ASE
- Mission 'Downriver Run' MediumGenesis Part 2 · ASE
- Mission 'Ferox Cull' EasyGenesis Part 2 · ASE
- Mission 'Ferox Cull' HardGenesis Part 2 · ASE
- Mission 'Ferox Cull' MediumGenesis Part 2 · ASE
- Mission 'Maewing Poach' EasyGenesis Part 2 · ASE
- Mission 'Maewing Poach' HardGenesis Part 2 · ASE
- Mission 'Maewing Poach' MediumGenesis Part 2 · ASE
- Mission 'Paracer Roundup' EasyGenesis Part 2 · ASE
- Mission 'Paracer Roundup' HardGenesis Part 2 · ASE
- Mission 'Paracer Roundup' MediumGenesis Part 2 · ASE
- Mission 'Shadowmane Prowl' EasyGenesis Part 2 · ASE
- Mission 'Shadowmane Prowl' HardGenesis Part 2 · ASE
- Mission 'Shadowmane Prowl' MediumGenesis Part 2 · ASE
- Mission 'Slide and Glide' EasyGenesis Part 2 · ASE
- Mission 'Slide and Glide' HardGenesis Part 2 · ASE
- Mission 'Slide and Glide' MediumGenesis Part 2 · ASE
- Mission 'Slipstream Sweep' EasyGenesis Part 2 · ASE
- Mission 'Slipstream Sweep' HardGenesis Part 2 · ASE
- Mission 'Slipstream Sweep' MediumGenesis Part 2 · ASE
- Mission 'Starwing Strike' EasyGenesis Part 2 · ASE
- Mission 'Starwing Strike' HardGenesis Part 2 · ASE
- Mission 'Starwing Strike' MediumGenesis Part 2 · ASE
- Mission 'Team Downriver Run' EasyGenesis Part 2 · ASE
- Mission 'Team Downriver Run' HardGenesis Part 2 · ASE
- Mission 'Team Downriver Run' MediumGenesis Part 2 · ASE
- Mission 'Velonasaur Stalk' EasyGenesis Part 2 · ASE
- Mission 'Velonasaur Stalk' HardGenesis Part 2 · ASE
- Mission 'Velonasaur Stalk' MediumGenesis Part 2 · ASE
- Outpost: Breeding Pits EasyLost Colony · ASA
- Outpost: Breeding Pits HardLost Colony · ASA
- Outpost: Breeding Pits MediumLost Colony · ASA
- Scorched Buried WhiteThe Island, Scorched Earth, Aberration, Extinction, Lost Colony, The Center, Astraeos, Ragnarok, and Valguero · ASA
- Scorched PurpleScorched Earth, Ragnarok, and Valguero · ASA
- Scorched Purple BonusScorched Earth, Ragnarok, and Valguero · ASA
Large Bear Trap — Detailed Guide
Pinning down big creatures
Once placed, the Large Bear Trap holds bigger creatures in place in ARK: Survival Ascended and ARK: Survival Evolved. The in-game line: "Immobilizes large creatures only." According to the ARK Wiki, a medium or large dinosaur that walks over it sets it off. A rider on a trapped creature is forced off and cannot mount again until the creature is freed.
How long it holds
Wild creatures break free quite easily and take minor damage. Tamed ones must wait out a 100-point timer that runs down over roughly 800 seconds. The ARK Wiki calls it very useful for taming the  Gallimimus and the
 Procoptodon, which stay stuck for roughly 10 to 15 seconds, enough time to land a few tranq darts.
Placing it and keeping it intact
It can go anywhere on the map except other players' foundations. Placed under a neutral creature, it does not anger it, but it only springs once that creature moves. Counted as a metal structure, it takes no damage from most sources; explosives and bosses are among the few that can harm it, and explosives also hurt the trapped creature. The ARK Wiki warns of a bug: a creature already attacking before the trap closes can destroy it, so stay well in front of the target. The owning tribe can pick an unsprung trap back up if the member is approved for demolition, while a sprung trap can only be demolished.
Crafting the trap
The engram needs level 31 and 12 engram points, and our records name the  Bear Trap as its prerequisite. It is made in a
 Smithy, or on an
 Argentavis Saddle per the ARK Wiki, from 15
 Hide, 10
 Fiber and 6
 Metal Ingot, for which
 Scrap Metal Ingot can stand in. A craft takes 5 seconds and gives 8 XP. Each trap weighs 4 and the stack size is 10, so a full stack weighs 40. Our records count 66 crate types that can contain it, for example the Aberration Blue and Aberration Surface Blue crates, and list it on 14 maps.